
JALGs Get's a REMAKE!
- Apr 4, 2025
- 5 min read
Updated: May 19
The project documentation of remaking my old profile icon Jalgs! ( Just A Little Guy )

The Original Jalgs was created from a bout of art block that I was trying to get over. With no idea's but an urge to make something I decided to tune into a weekly live stream called Creature Corner, hosted by Jared Krischevsky and frequent co-host Matt Millard. I gave myself the length of the stream (3 hours), and a sphere, and by the end I was to have something sculpted, retopo'd and textured. An Jalgs with the result.
I would love this project, and would use it for my profile across all my social media platforms. Unfortunately, he would become demoted for some more professional looking headshots as I neared graduation and needed to begin my journey of looking for work, but I began thinking about what project I wanted to do next.
I used to enjoy live streaming before Think Tank, and thought it would be a fun hobby to get back into and would make me stay accountable to making consistent CG work.
So to kick start my journey back into being my own artist, I decided a remake of Jalgs was in order! Plus, I could rig and animate him to be used for twitch emotes, reactions, and more to bring my stream to life.
Finding our forms


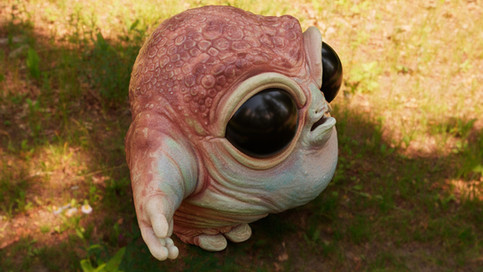
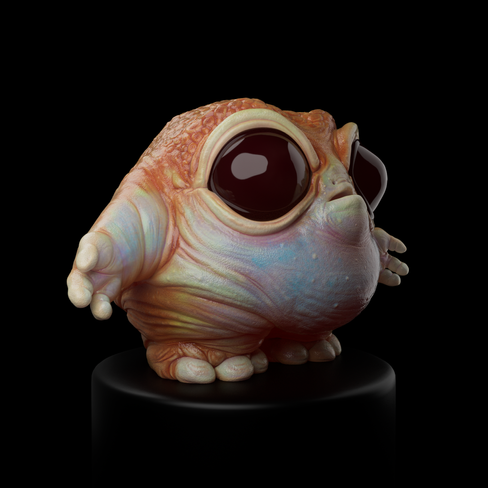
Starting this project, I knew I wanted to take some artistic directional differences: proper eyes, a mouth, and have some creature as my reference point. So we chose the desert raindrop frog. A round, grouchy, bulbously looking fella that gave the kind of energy I was looking for in my new version of Jalgs. A sassy side-kick in my mind.
My Reference Board

Refining Forms, Digging Details, Adding Colour


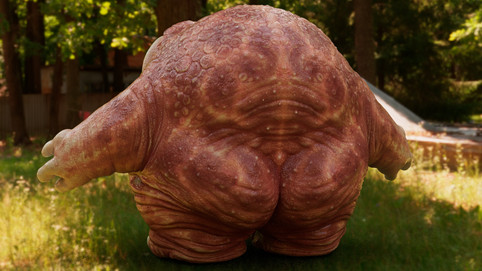
For this sessions I wanted to focus on cleaning up some of the established forms, figuring out what kind of direction I wanted for my details; a wrinkly back and bum, with a more bumpy top, and lots of rolly-polly shapes. Along with adding a touch of colour at the end to establish more direction on where I wanted to go with the overall design.
Refining


We've got our ideas down, now time to clean them up and push them forward. I didn't imagine a scaly aspect to this creature, but it wound up become my own curiosity as I haven't had much experience making scales, and the method I had began using for the various bumps started to lean into this direction, so I fallowed it.
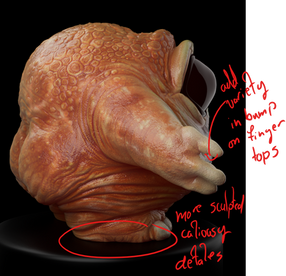
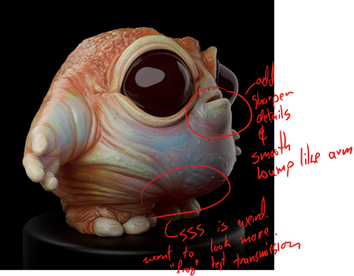
Sculpting Polish


For this session I wanted to push the tertiary details and get to a point where I could carry on to UV's, Texturing, and getting a render scene started.
For this project I want to render in Arnold. I've used Arnold lightly in the past, but have never properly dug into it, so I'm using this project as an opportunity to dive in. For the end of this session we have ourselves just a HDRI and the low poly from Zbrush.
Retopo Begins!


A short session, but a start nonetheless! Keeping it simple, keeping it clean, it's retopology.
Finishing Retopo & UV's


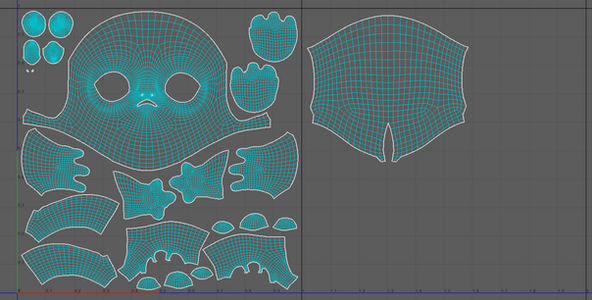
Retopo is finished! After that is finished, -> I bring the model into Zbrush -> subdivide it once -> do a projection to recapture some details -> then bring it back into Maya to do the UV unwrapping -> then set the texel density for 2k rendering (2560 x 1440) .
There are some spots I could go back and adjust. I think the typology behind the eyes is a bit denser than I would've liked, but we balance with what takes up more time than necessary vs what keeps this project moving. So we sacrifice some typology for the sake of time.
Displacement in Arnold & Texturing Begins!


The majority of this session was spent on figuring out how to setup the displacement network inside Arnold. This is what allows me to retain my sculptural details when I render, while working on a low resolution model that can later be rigged an animated.
We've got some base colours put down inside of Substance Painter. I think I'm going to be sticking pretty close to the green frog reference I've got attached above.
Next I wanna keep pushing texturing, along with setting up a progression camera starting with some clay renders.

Texturing


Texture day! Very happy with the level of progress accomplished here. I'll play with some tilable stuff next to push the realism for the more high res renders, as this currently is all just handed painted.
Progression cameras have been placed.
Next is eyes, and look dev. So got some fun procedural work up next. Along with getting some clay renders, did not get to those this session...
Texturing in Mari - July 14


Been a minute since I touched this project, but we've been noodling away at it once again. I wasn't super happy with the texturing that I did in Substance Painter, so I decided to move to Mari. We've got a good foundation for the diffuse, along with a simple cellular noise for the bump map to give some surface texture.
More noodling to be done, but a solid and happy update nonetheless.
Texturing in Mari - July 17

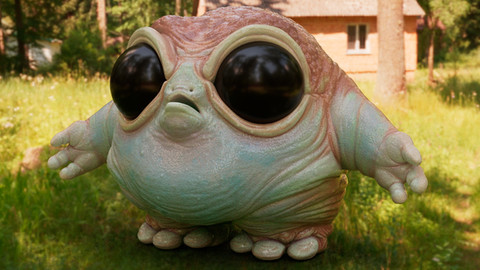


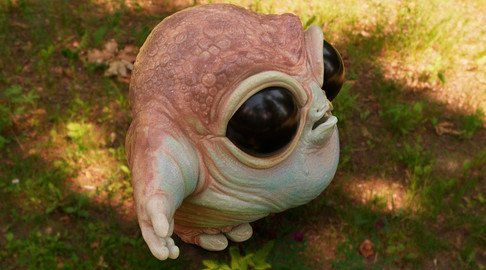
We've continued texturing, and we've added some Subsurface Scattering.
Texturing in Mari - July 25


I started a new part-time job, so I've been using this is my wind down noodling project. Need to get to the eyes, but I've been having fun texturing.
Eyeballs - August 21


Been slowly chipping away at making some eyes, still early stages, still figuring things out, I was thinking of trying to go for this spiderweb-esque pattern but I'm not sure I really like the look so going to reassess and play around with some other ideas.
Eyeballs - Sept 24


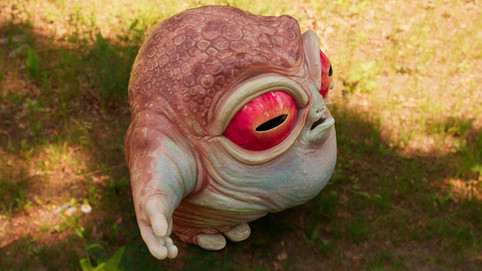

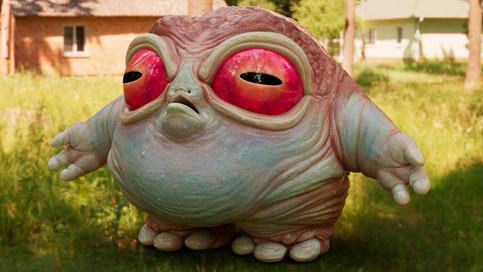
Took a couple of itterations, but I think we're landing on something.
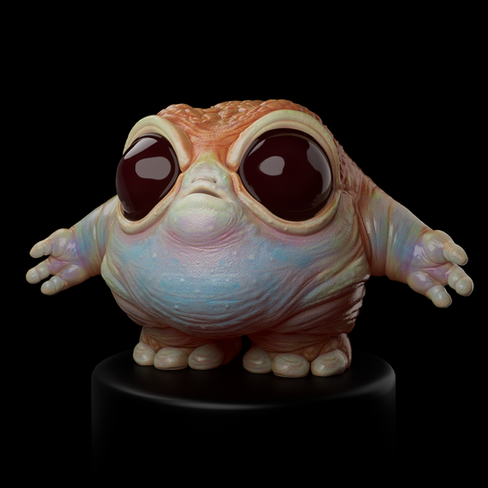
Wrapping up final Textures and Look Dev - May 18 2026
It's been a minute, and I've been slowly picking up this project again after leaving it for .... a while.
But I have an industry job now so that's cool!
An I now can start using the industry knowledge that I've been gaining over the last 6 months, such as lighting rigs and look dev, to shape what I'm doing in my own work. So here's what we've been up to.


I have some notes as to what I want to do next.


Comments